

How To Make Laptop Discoverable Windows 10
Enable network discovery
If your Windows 10 computer or device tin can't view other computers on the network, two things are probably at mistake: You either assigned the incorrect network profile (public instead or private), or network discovery is turned off for some reason.Here'south how to activate network discovery in Windows 10 for your active network contour:
-
Open Settings.
The Settings window appears.
-
Click Network & Internet.
Your network and Internet related settings are shown.
-
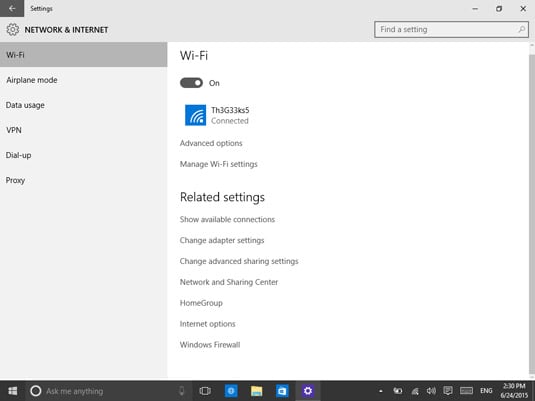
In the panel on the left, click either Wi-Fi (if you're connected to a wireless network) or Ethernet (if you're connected to a network using a network cable).
A window with settings for your network appears.
-
Find the Related setting section on the correct, then click Alter Advanced Sharing Settings.
The Advanced Sharing Settings window appears.
-
Expand the network profile currently assigned to your network connectedness.
It is marked with the words "current profile" on the right side of its name.
-
In the Network discover department, select "Turn on network discovery." Also, check the box that says "Plough on automatic setup of network connected devices."
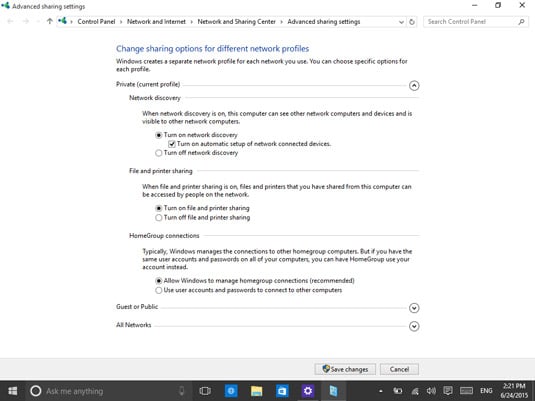
Turning on network discovery.
-
Click Relieve Changes.
-
Close the Settings window.
You don't ever desire to enable network discovery when you're continued to public networks. So, if yous're connected to a public network similar those in airports and cafes, be sure to set up the contour to Public.
Enable file and printer sharing
When you're continued to private networks, Windows ten automatically turns on the File and Printer Sharing setting. In this manner, yous tin can easily share folders, files, and printers with other computers and devices in your network. Still, if your network administrator adjusts this setting, you may need to manually turn it on or off, depending on your needs.Here's how to activate the File and Printer Sharing setting in Windows 10 for your active network connectedness:
-
Open Settings.
The Settings window appears.
-
Click Network & Internet.
Your network and Internet-related settings are shown.
-
In the console on the left, click either Wi-Fi (if you're continued to a wireless network) or Ethernet (if you're continued to a network using a network cable).
A window with settings for your network appears.
-
Find the Related setting section on the correct, then click Modify Advanced Sharing Settings.
The Advanced Sharing Settings window appears.
Accessing advanced sharing settings in Windows x.
-
Expand the network profile currently assigned to your network connectedness.
It's identified as "current contour."
-
In the File and Printer Sharing section, select Plow On File and Printer Sharing.
-
Click Save Changes.
-
Close the Settings window.
If y'all're connected to a public network like those in airports and cafes, exist sure to assign Public as the profile for that connection. As well, don't enable the File and Printer Sharing setting when yous're connected to public networks.
Enable public folder sharing
The Public binder is located on your hard drive in C:UsersPublic. All user accounts registered in Windows take access to it. That's why it'southward named Public. Any file and folder found in C:UsersPublic is completely accessible to all users on the estimator. Depending on your network sharing settings, this folder and its contents can also exist accessed by all other computers and devices that are part of the same network.To turn on Public Folder Sharing, follow these steps:
-
Open Settings.
The Settings window appears.
-
Click Network & Internet.
Your network and Cyberspace-related settings are shown.
-
In the console on the left, click either Wi-Fi (if you lot're continued to a wireless network) or Ethernet (if you're connected to a network using a network cable).
A window with settings for your network appears.
-
Find the Related setting department on the right and click Modify Advanced Sharing Settings.
The Advanced Sharing Settings window appears.
-
Curl down and expand the All Networks category of settings.
-
In the Public Folder Sharing section, select Turn On Sharing So Anyone with Network Admission Can Read and Write Files in the Public Folders.
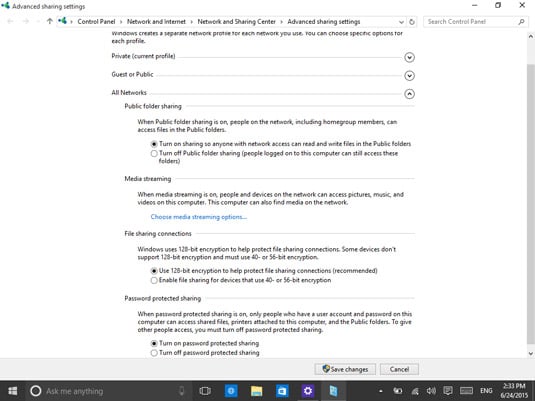
Turning on Public Folder Sharing.
-
Click Save Changes.
-
Close the Settings window.
Enable password protected sharing
When Countersign Protected Sharing is turned on, only people who have a user account and password on your reckoner or network domain (in the case of concern networks) can access shared files and printers attached to your Windows ten computer or device, as well as your public folders. Information technology's a good idea to avoid disabling Password Protected Sharing, merely y'all may demand to practise that in some situations, such as when you want to give other people access.To turn on Countersign Protected Sharing, follow these steps:
-
Open Settings.
The Settings window appears.
-
Click Network & Internet.
Your network and Net-related settings are shown.
-
In the panel on the left, click either Wi-Fi (if y'all're connected to a wireless network) or Ethernet (if you're connected to a network using a network cable).
A window with settings for your network appears.
-
Find the Related setting section on the correct and click Modify Advanced Sharing Settings.
The Avant-garde Sharing Settings window appears.
-
Coil downward and expand the All Networks category of settings.
-
In the Password Protected Sharing section, select Turn On Password Protected Sharing.
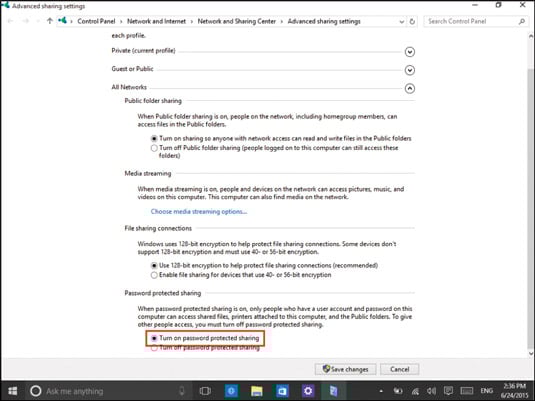
Turning On countersign protected sharing.
-
Click Relieve Changes.
-
Close the Settings window.
About This Commodity
This article tin be found in the category:
- Windows x ,
Source: https://www.dummies.com/article/technology/computers/operating-systems/windows/windows-10/how-to-enable-network-discovery-and-configure-sharing-options-in-windows-10-140265/
Posted by: mitchellovat1951.blogspot.com
0 Response to "How To Make Laptop Discoverable Windows 10"
Post a Comment